|
IMPORTANT
|
|
The Envelope Cassette-E1 can only be loaded as Paper Drawer 2.
|
|
IMPORTANT
|
|
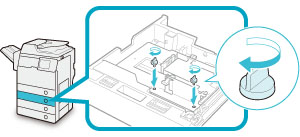
Do not forcefully move the front and side guides of the paper drawer in the wrong direction. Doing so may damage the paper drawer.
Do not print on both sides of an envelope. Doing so may cause paper jams, dirty prints, or make the inside of the machine dirty.
Do not load the following types of envelopes inside the envelope cassette. Doing so may cause paper jams, dirty prints, or make the inside of the machine dirty.
Curled, creased, or folded envelopes
Very thick or thin envelopes
Damp or wet envelopes
Torn envelopes
Irregularly shaped envelopes
Envelopes with clasps or windows
Envelopes that have already been sealed
Envelopes with holes or perforations
Envelopes with specially coated surfaces
Envelopes made of surface treated coloured paper
Envelopes that are self-sticking, which use ink, glue, or other substances that can melt, burn, vaporize, or emit smells under the heat of a fixing unit (approximately 200°C). Depending on the materials used for the seal, the glue may melt under the fixing unit's heat, sealing the envelopes.
If you are printing on envelopes, empty the output tray when up to 10 printed envelopes accumulate in the tray.
Envelopes should be stored in a place away from high-temperatures and humidity.
If there is a temperature difference between the location where the envelopes are stored and the location where the envelopes are being printed, leave the envelopes in the printing location at room temperature before you use them.
Correctly match the [Paper Settings] in [Preferences] (Settings/Registration) with the size of the envelopes being loaded. Failure to do so may cause paper jams, dirty prints, or make the inside of the machine dirty.
If you want to adjust the width guides to load ISO-C5 envelopes, contact your local authorized Canon dealer.
|
|
IMPORTANT
|
|
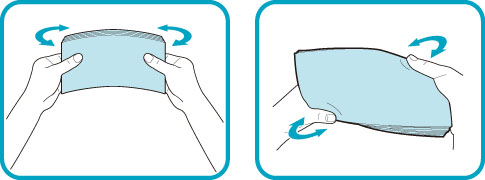
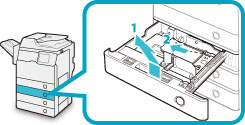
If envelopes are not neatly aligned before being loaded, a problem with the paper supply or a paper jam may occur. Fix any curls or bends before loading the envelopes.
|
 |
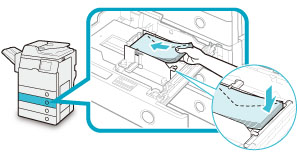
|
|
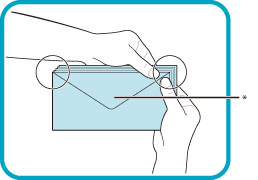
* Flap
|
 |
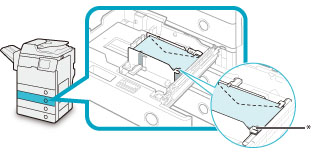
|
|
* Flap
|
|
IMPORTANT
|
|
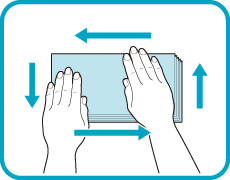
Take particular care to spread the envelopes out in the direction that they will be fed.
|
|
IMPORTANT
|
|
If you use envelopes that have glue attached to their flaps, the glue may melt due to the heat and pressure of the fixing unit.
Do not print on the back side of the envelopes (the side with the flap).
If the envelopes become filled with air, flatten them by hand before loading them into the Envelope Cassette-E1.
|
 |
|
 |
|
|
IMPORTANT
|
|
Envelopes which have been rolled or curled must be straightened out prior to use.
Make sure that the height of the envelope stack does not exceed the height limit mark (
 ). ).The maximum height (quantity) of envelopes varies, depending on the envelope type and user operating conditions, but as a reference, 30 mm is approximately 50 envelopes.
|
 |
 CAUTION CAUTION |
|
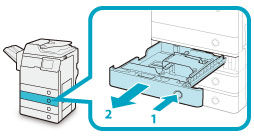
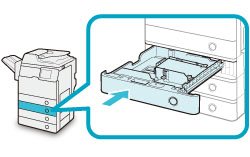
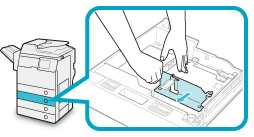
When returning the paper drawer to its original position, be careful not to get your fingers caught, as this may result in personal injury.
|
|
IMPORTANT
|
|
Never place paper or any other items in the empty part of the paper drawer next to the envelopes. Doing so may cause paper jams.
|
|
NOTE
|
|
If output has been stopped due to an insufficient number of envelopes, load more envelopes, and follow the instructions on the touch panel display. Printing resumes.
|
|
IMPORTANT
|
|
Make sure that you change the envelope settings from the Settings/Registration screen before carrying out the following procedure. (See "Paper Settings.") Otherwise, the machine may not recognize the changes you have made.
|
|
|
|
 |
|
 |
|
|
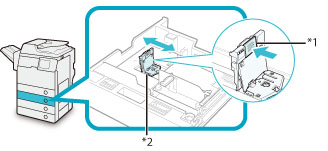
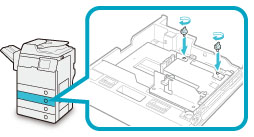
*1 Lever
*2 Side Guide
|
 |
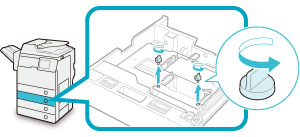
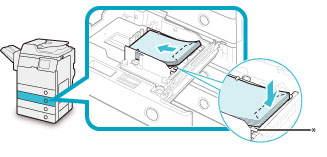 * Claw
|
|
|
IMPORTANT
|
|
Envelopes which have been rolled or curled must be straightened out prior to use.
Make sure that the height of the envelope stack does not exceed the height limit mark (
).The maximum height (quantity) of envelopes varies, depending on the envelope type and user operating conditions, but as a reference, 30 mm is approximately 50 envelopes.
|
|
NOTE
|
|
For details on how to change the registered envelope information for the drawer, see "Paper Settings."
|
|
CAUTION |
|
When returning the paper drawer to its original position, be careful not to get your fingers caught, as this may result in personal injury.
|
|
IMPORTANT
|
|
Never place paper or any other items in the empty part of the paper drawer next to the envelopes. Doing so may cause paper jams.
|
|
NOTE
|
|
If output has been stopped due to an insufficient number of envelopes, load more envelopes, and follow the instructions on the touch panel display. Printing resumes.
|
