|
NOTE
|
|
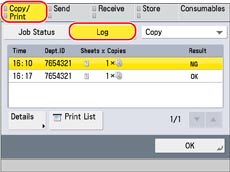
You can select a job type from the drop-down list to display only jobs of a specific type in the list.
|
|
[Details]:
|
Displays detailed information for the selected job. Check the detailed information → press [OK] to return to the Copy/Print screen.
|
|
[Print List]:
|
Prints the job log list. Press [Print List] → [Yes] to print the list.
|
|
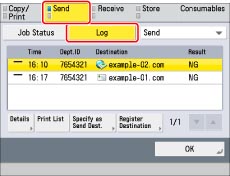
[Details]:
|
Displays detailed information for the selected job. Check the detailed information → press [OK] to return to the Send screen.
|
|
[Print List]:
|
Prints the job log list. Press [Print List] → [Yes] to print the list.
|
|
[Specify as Send Dest.]:
|
Displays a screen in which the address of the selected job is entered. Check the address → press [OK] to display the Send screen.
|
|
[Register Destination]:
|
Registers the selected job as the destination. Select [Address Book] or [One-Touch] to display the Settings/Registration screen. (See "Register Destinations" or "Registering One-Touch Buttons.")
If [Address Book PIN] is set in [Set Destination] (Settings/Registration), a screen appears prompting you to enter the password. (See "Setting the Address Book.")
|
|
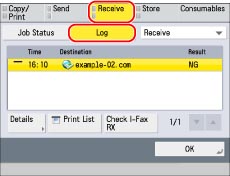
[Details]:
|
Displays detailed information for the selected job. Check the detailed information → press [OK] to return to the Receive screen.
|
|
[Print List]:
|
Prints the job log list. Press [Print List] → [Yes] to print the list.
|
|
[Check I-Fax RX]:
|
Reception starts if an I-fax has been received by the POP server. [Check I-Fax RX] is displayed when a received job is selected.
|
|
NOTE
|
|
To use [Check I-Fax RX], set <POP> to 'On' in [Communication Settings] to enable the machine to receive via POP. (See "Common Communication Settings for E-Mail/I-Fax.")
You can check reception without pressing the Check I-Fax RX key in the following cases (See "Common Communication Settings for E-Mail/I-Fax."):
<POP Interval> in [Communication Settings] is set to a value other than '0'.
I-faxes are received with SMTP without going via a server.
|
|
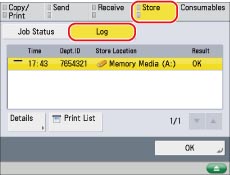
[Details]:
|
Displays detailed information for the selected job. Check the detailed information → press [OK] to return to the Store screen.
|
|
[Print List]:
|
Prints the job log list. Press [Print List] → [Yes] to print the list.
|
|
NOTE
|
|
The list can be printed only if A4 (plain, recycled, or colour) is loaded in one of the paper sources that is set to 'On' in [Other] in [Paper Drawer Auto Selection On/Off]. (See "Enabling Paper Drawer Auto Selection.")
However, if [Consider Paper Type] for [Copy] is set to 'On' in [Paper Drawer Auto Selection On/Off], you cannot print from a paper source with colour paper specified.
|
