Replacing the Staple Cartridge (Staple Finisher-R1)
This section describes how to replace the staple case and staple cartridge in the stapler unit.
When the Staple Finisher-R1 is almost out of staples and the staple cartridge must be replaced, a screen prompting you to replace the staple cartridge appears on the touch panel display. Follow the procedure described below to replace the staple cartridge.
NOTE
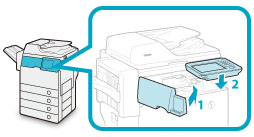
The Staple Finisher-R1 is an optional product.
We recommend that you order staple cartridges from your local authorized Canon dealer before your stock runs out.
Use only staple cases intended for use with this machine.

1.
Open the front cover of the finisher.
1. Lift the control panel.
2. Open the front cover of the finisher.
2.
Grasp the staple case by the green tab to pull it out from the stapler unit.
* Staple Case
3.
Squeeze and lift the empty staple cartridge by its sides marked with arrows to remove it from the staple case.
NOTE
You can lift the staple cartridge only when no staples are left inside the cartridge.
4.
Insert a new staple cartridge into the staple case.
IMPORTANT
Do not remove the seal that holds the staples together before you place the staple cartridge into the staple case.
Use only staple cartridges designed for use with this machine. (See "Consumables.")
Only one staple cartridge can be inserted at a time.
Make sure that you pull the seal straight out. If you pull it out at an angle, it may tear.
5.
Return the staple case to its original position in the stapler unit.
6.
Close the front cover of the finisher.
1. Close the front cover of the finisher.
2. Lower the control panel back in place.
CAUTION
When closing the front cover of the finisher, be careful not to get your fingers caught, as this may result in personal injury.
NOTE
After the cover is closed, the stapler unit may automatically perform a "dry" stapling operation to reposition the staples.
» Maintenance » Loading Paper » Replacing the Staple Cartridge (Staple Finisher-R1)
0ALK-0FE